


 Mohanraj

Different types of Tie knots:
- The single node
- The Double Knot
- The Windsor knot
- The Half Windsor
- The small knot
- The Bow Tie
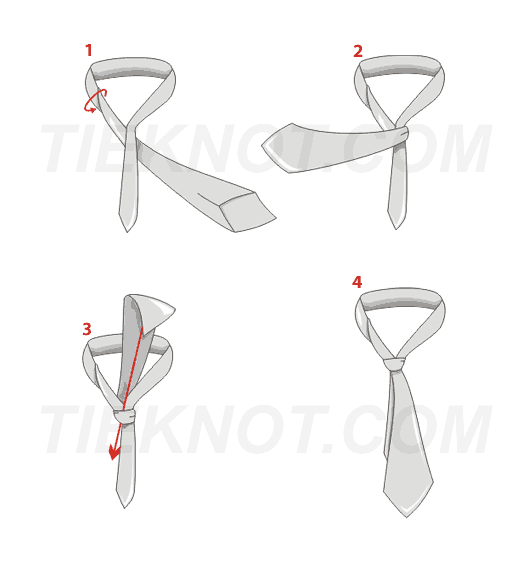
1. The single node(knot)
The simple knot is the classic tie knots. It is by far the most widely used because it is simple to do and it accords with the most ties and almost every shirt collars. It is perfect for both medium or large.
Conical and elongated, the single node is narrow with thin ties and broader ties with thick.
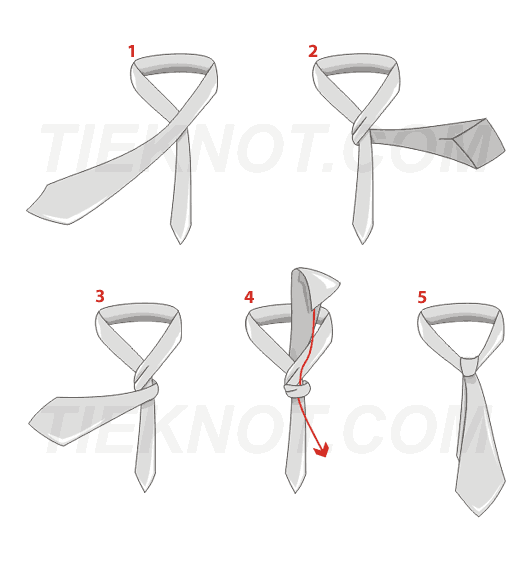
Preparation: Go back collar of your shirt, its close button and place your tie.
The men of average size will position the little patch at the waist. Tall men will place him above. Men with short busts in turn prefer the double knot whose shape is similar.
The men of average size will position the little patch at the waist. Tall men will place him above. Men with short busts in turn prefer the double knot whose shape is similar.
Steps:
Step 1: Below the neck, cross the wide end over the narrow end.
Step 2: Slide the wide end underneath the narrow end.
Step 3: Next, bring the wide end over the narrow end.
Step 4: Pull the wide end up in the tie by placing your index in node formation. Remove your finger and slide the pan into the large loop.
Step 5: Hold the narrow end. Gently pull the wide end to tighten the loop. Adjust the knot, then go back to the last button of the cervix.
Once knotted tie, the little patch should not be visible and the end of the large pan should be at waist level.
2. The Double Knot
The double knot is very close to the single node except that it requires a second rotation at the beginning, the wide end is passed twice around the narrow end.
Thicker in appearance than the simple knot, double knot is ideal for most shirts. It is also perfect with all ties except those too thick.
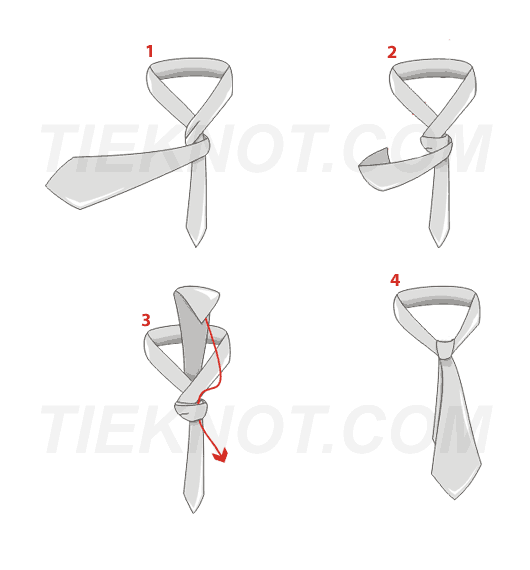
Preparation: Put your tie around the neck after having closed the last button of the shirt collar and back.
Both sides of the tie are placed asymmetrically. The large pan is left much longer than the narrow end.
Both sides of the tie are placed asymmetrically. The large pan is left much longer than the narrow end.
The double knot in 4 stages:
Step 1: In the neck, pass the first time the wide end around the narrow end (see step 1 to 3 of single node).
Step 2: Spend a second time the wide end around the narrow end.
Step 3: Place the wide end up in the tie and drag it into the loop formed by the first or second rotation.
Step 4: Finally adjust the knot obtained, reassemble and center in the middle of the neck.
3. The Windsor knot
The Windsor knot is the knot of occasions. Very English, its name comes from the Duke of Windsor who popularized it.
As it is large, it must be done preferably on collar apart, like Italian collars or collars Windsor.
Sometimes complex to perform, it needs to be able to fall between the two sides of the neck and hide the top button of his shirt.
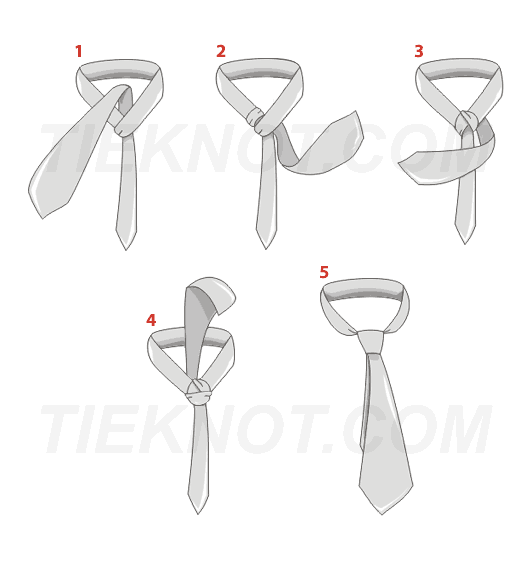
Preparation: Put your tie around your neck after you close the top button of his shirt collar and back. Both sides of the tie are placed asymmetrically. The large pan is left much longer than the narrow end.
Steps:
Step 1: Cross the wide end over the narrow end. Keep the crossing and next, make a loop by climbing the wide end under the tie and the downwash.
Step 2: Bring the wide end to the other side under the crossing. Make another loop by climbing the wide end on the tie and the downwash.
Step 3: Go into the large pan horizontally above the narrow end.
Step 4: Take the wide end vertically in the tie, steaming it and drag the wide end through the loop.
Step 5: Hold the narrow end, gently pull the wide end to tighten the tie, center node at the top and middle of the neck.
4. The Half Windsor
The Half Windsor resembles the Windsor knot while being thinner and easier to do.
It fits perfectly fine with ties or very thick. Elegant and triangular, it is preferably on a collared shirt or a classic open-necked shirt.
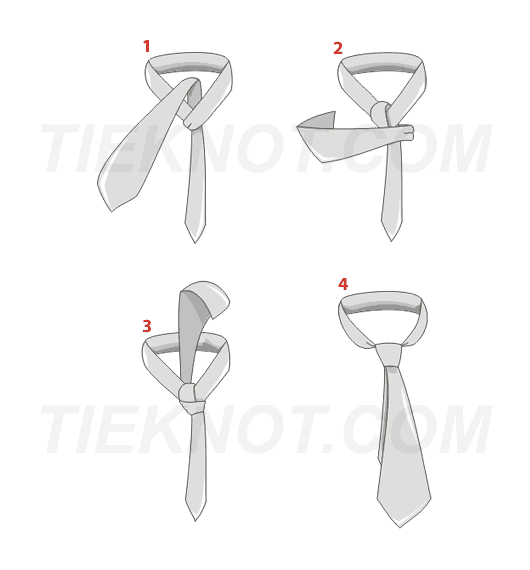
Preparation: Place the tie around the neck. The average sizes will place the small pan well above the belt.
The Half Windsor is done in 4 stages:
Step 1: Cross the wide end over the narrow end. Keep the crossing and next, make a loop in the large amount in the pan and tie in the spring.
Step 2: Go behind the large pan horizontally, and then to the narrow end.
Step 3: Enter the intersection, go vertically large pan under the tie and drag it into the loop.
Step 4: Hold the narrow end. Pull the wide end to form the knot. Drag it to the last button of the shirt collar and center.
At the end of the knot, the small section shall not be visible and the end of the large pan should be at waist level.
5. The small knot
The little bow is as its name implies small.
It fits particularly with ties or thick collar shirts tight. it is to avoid on long-necked shirts or rejected.
Quite easy to achieve even if it requires a "twist" of 180 °, the small knot is the simplest formula to tie a tie.
Preparation: Place your tie in place and turn the large pan to 180 degrees (see diagram above). Or to avoid the "twist", simply drag your tie backwards around the neck. The large pan is left longer than the narrow end.
Achieving a single node is divided into 4 stages:
Step 1: In the neck, bring the wide end underneath the narrow end.
Step 2: Then move the wide end over the narrow end.
Step 3: Hold the loop by passing the wide end below upwards; big steaming pan and slide it into the loop.
Step 4: Finally adjust the knot in his tie and then remount it.
For the node is fully successful, the last button of the shirt and the little patch of the tie should be hidden.
6. The Bow Tie
Just like the classic tie, the butterfly comes in all colors and all reasons.
Mostly black bow tie is worn with a black tuxedo and a white shirt with wing collar and can also be worn more casually with a suit and collared shirt aside.
The Bow Tie:
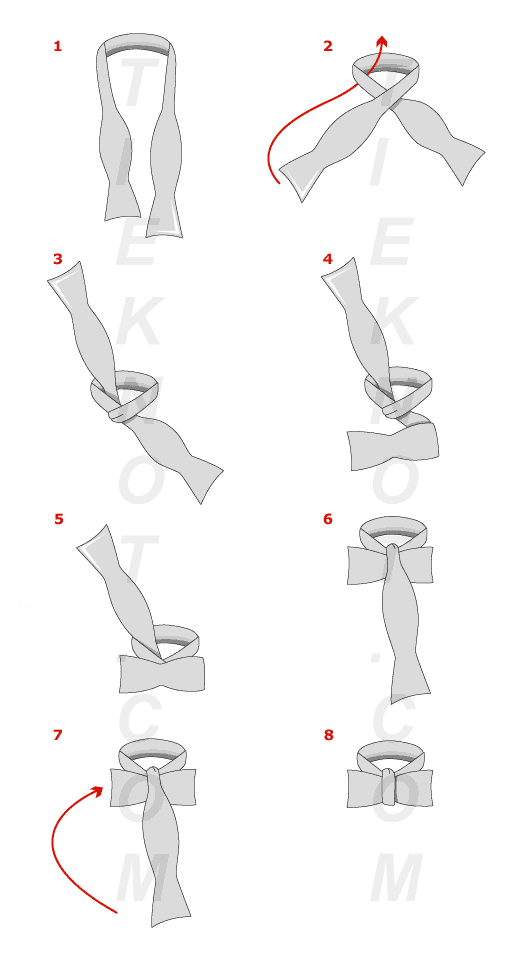
The steps of the bow tie:
Step 1: Place the two sections, one lower than the other.
Step 2: Around the neck, fold the long side on the shortest.
Step 3: Slide the side rail up under the butterfly.
Step 4 and 5: Divide the two wings of a butterfly folding horizontally pan the shortest.
Step 6: Fold the long side on the front of knot formation.
Step 7: Hide the side rail then below the pan folded.
Step 8: Finally adjust the throttle by pulling on both wings.
At the end of the knot, the width of the bow tie should theoretically be roughly equivalent to the distance between the center of the eyes.
 Posted in:


0 comments:
Post a Comment